Smart-Greenhouse
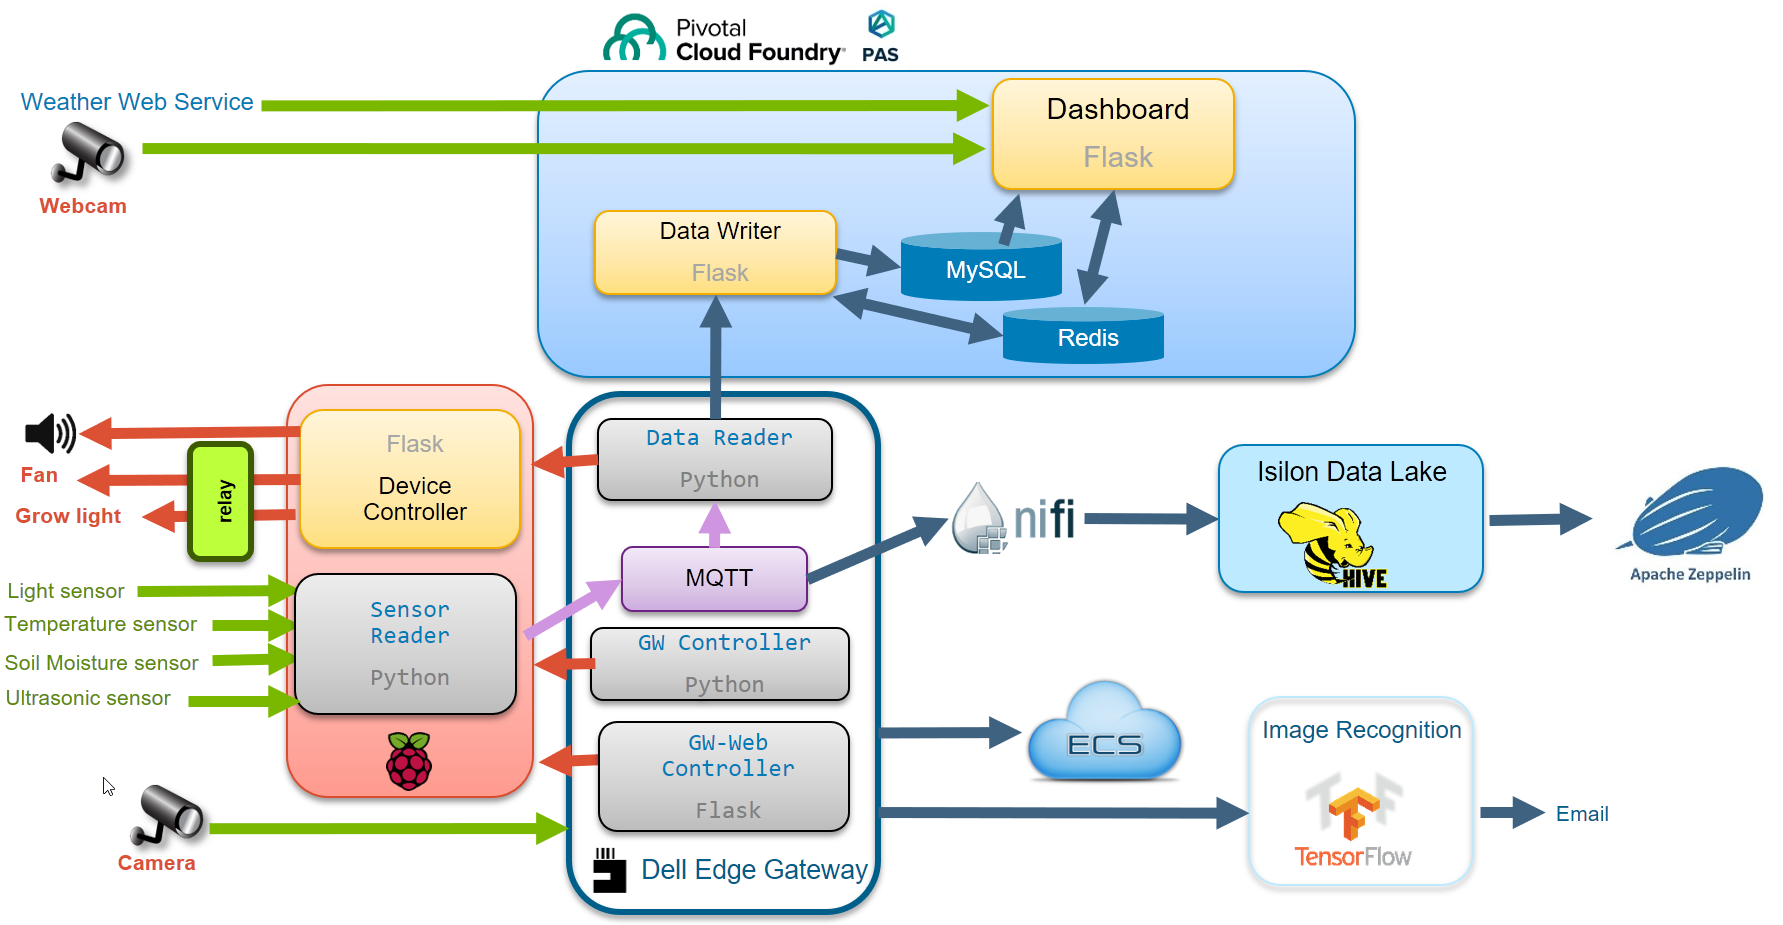
This is a project to show how a traditional greenhouse can be transformed using IoT, Big Data Analytics and AI. Raspberry Pi and Dell EdgeGateway 5000 are used at the edge to collect data and control the LED light and fan. Pivotal Application Service is used to host the applications. Isilon Hadoop is used to store the historical data and Zeppelin is used for visualization. Elastic Cloud Storage (ECS) is used to store the snapshot taken by the security camera attached to the Edge Gateway. The snapshot will be sent to the Image Recognition VM to analyze. It will try to identify the object in the snapshot.
Here is a demo video.
Hardware:
Dell Edge Gateway 5000
Raspberry PI 3 model B
16 GB micro SD card
Power Adapter for Pi
24 Sensor Module kit
Raspberry PI case
Belle 5V 4-Channel Relay Board
White Box
Mini Garden
USB Fan
USB Male to Female Extension Cable
3 metres of cable for wiring
Soldering Iron kit
Setup:
Clone this repo to a Linux machine (Centos 7.4). This will be the Image Recognition VM.
git clone https://github.com/siaut/Smart-Greenhouse.git ### Raspberry Pi: 1. Setup Raspberry Pi with Raspbian.
-
Copy RaspberryPi/gh-sensors directory to /root/iot/gh-sensors.
-
Configure and run these 2 services :
 cp startsensors.service controller.service /etc/systemd/system
 systemctl enable startsensors
 systemctl enable controller
Dell Edge Gateway 5000:
-
Install Ubuntu desktop 16.04 in Edge Gateway
-
Install MQTT(Mosquitto Broker):
apt-get update apt-get install mosquitto apt-get install mosquitto-clients -
Copy DellEdgeGateway to /opt/greenhouse
-
Configure and run these 3 services:
 cd DellEdgeGateway
 cp *.service /etc/systemd/system/

 systemctl enable gwcontroller.service
 systemctl enable readsensors.service
 systemctl enable web-gwcontroller.service
Image Recognition VM:
-
Get a Google Map API key.
-
Install PCF CLI client
-
Login to PAS (Cloud Foundry), subscribe MySQL and Redis services.
 cf login -a api.system.abc.com --skip-ssl-validation
 cf create-service p.mysql db-small iot
 		cf create-service p.redis cache-small redis1
Push gh-controller:
	cd CloudFoundry/gh-controller
	cf push gh-controller
Push greenhouse:
	cd CloudFoundry/greenhouse
	cf push greenhouse
Bind the services to the applications:
 cf bind-service gh-controller iot
 cf bind-service gh-controller redis1
	cf bind-service greenhouse iot
 cf bind-service greenhouse  redis1
Create environment variables:
cf set-env greenhouse mapkey YYY
Restage the applications:
	cf restage gh-controller
	cf restage greenhouse
- Deploy PivotalMySQLWeb
-
Login to PivotalMySQLWeb to create these tables:
DROP TABLE IF EXISTS sensors; create table sensors( ctime DATETIME, temp float , light int, moisture float, distance float, led int, fan int, waterpump int, PRIMARY KEY ( ctime ) ); DROP TABLE IF EXISTS alerts; create table alerts( ctime DATETIME, filename varchar(255) , distance float, aws text, msvision text, PRIMARY KEY ( ctime ) ); -
Install Tensorflow:
yum -y install epel-release yum -y update yum -y install gcc gcc-c++ gcc-gfortran openssl-devel libffi-devel python-pip python-devel atlas atlas-devel pip install --upgrade https://storage.googleapis.com/tensorflow/linux/cpu/tensorflow-1.7.0-cp27-none-linux_x86_64.whl -
Install screen:
yum -y install screen -
Start screen and run the tensorflow image recognition application:
 screen
 image-recognition-vm/start-image-recognition.sh
ECS:
- Create a bucket: iotcamera01
-
Update the Object Storage Endpoint, Access Key ID and Secret Access Key in:
 CloudFoundry/greenhouse/app.py
 DellEdgeGateway/greenhouse/AxisCamera.py
Isilon Hadoop:
-
Setup Isilon and HortonWorks. Install Spark2, Hive, NiFi and Zeppelin.
-
Create user in Isilon:
isi auth groups create nifi --zone hdpzone --provider local isi auth users create nifi --primary-group nifi \ --zone hdpzone --provider local \ --home-directory /ifs/hdp/hadoop/user/nifi -
Add user to Hadoop nodes. This is performed on the master node:
useradd -u 2003 nifi sudo -u hdfs hdfs dfs -mkdir -p /user/nifi sudo -u hdfs hdfs dfs -chown nifi:nifi /user/nifi sudo -u hdfs hdfs dfs -chmod 755 /user/nifi -
Create a database in Hive to store historical data:
SSH to the master node beeline !connect jdbc:hive2://masterdns.pgen6.local:2181,pnode2.pgen6.local:2181,pnode1.pgen6.local:2181/;serviceDiscoveryMode=zooKeeper;zooKeeperNamespace=hiveserver2 create database smartgreenhouse; use smartgreenhouse; CREATE TABLE greenhouse2 ( currenttime TIMESTAMP, light INT, moisture DOUBLE, temperature DOUBLE, distance DOUBLE ) CLUSTERED BY (currenttime)INTO 24 BUCKETS ROW FORMAT DELIMITED STORED AS ORC TBLPROPERTIES('transactional'='true'); - Create a NiFi Flow. Open NiFi and import NiFi/Greenhouse_v2.xml template. Start the Greenhouse NiFi Flow.
- Create a Zeppelin notebook. Open Zeppelin and import Zeppelin/Smart Greenhouse.json note.